Using the Media section in Broadcast
What the Media section is for
The Media section in Broadcast is where you add the content that will appear on your screens. This is the starting point for screen content before it is organised into collections or added to playlists.
From Media, you can create three types of content using the labels shown in the app under Content Type:
- Image
- Video
- Product
Add media content
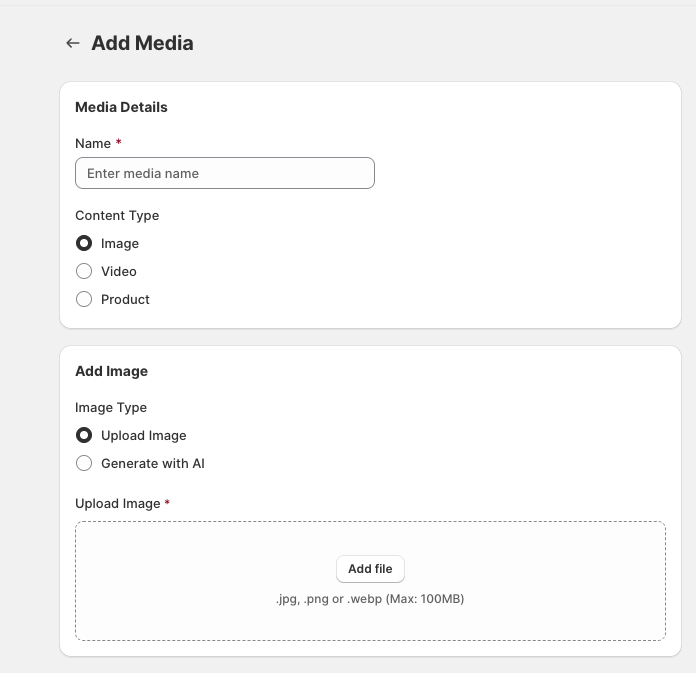
In Broadcast, open Media and choose Add Media.
In the Media Details section, enter a name in Name, then choose a Content Type: Image, Video, or Product.
If you select Image, the Add Image section lets you choose an Image Type:
- Upload Image if you already have an image file
- Generate with AI if you want Broadcast to create an image for you
If you select Video or Product, continue with the relevant content setup shown in the form.
After adding the content, review the remaining sections such as Media Settings, Link Associated Products (Optional), and Schedule Display Time (Optional).
These settings control how long the content shows, where it is eligible to appear, and when it can play on screens.
Upload an image
When Content Type is set to Image and Image Type is set to Upload Image, use Upload Image to add your file.
Select Add file and upload one of the supported file types:
.jpeg.png.webp
The maximum file size for image uploads is 100 MB.
.jpeg, .png, or .webp format, up to 100 MB. If your file does not upload, check the file type and size first.Generate an image with AI
If you do not want to upload a file manually, select Generate with AI in the Image Type area.
This gives you a second way to create image-based screen content directly from the Add Media flow, instead of preparing the image outside Broadcast first.
Set the display duration
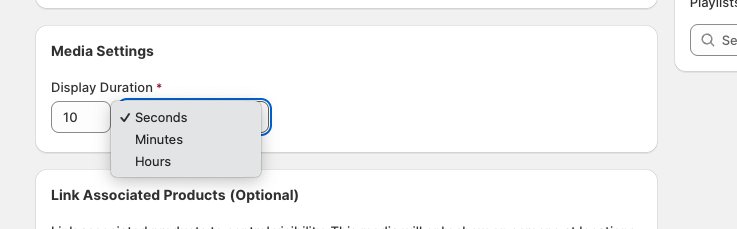
Use the Media Settings section to control how long the media stays on screen.
The key field here is Display Duration. You can set the amount manually and choose the time unit from the dropdown:
- Seconds
- Minutes
- Hours
Enter the number you want, then choose whether that value is measured in seconds, minutes, or hours.
Link products to control visibility
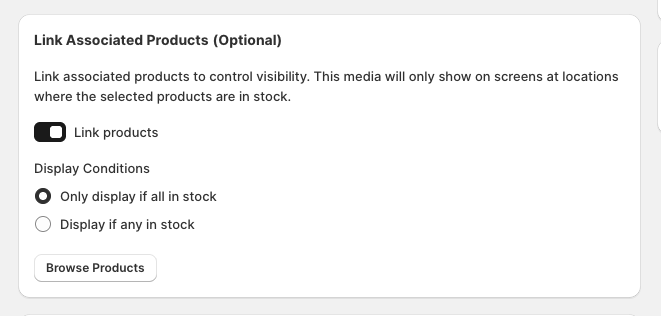
The Link Associated Products (Optional) section lets you connect media to products.
This is optional, but it is useful when you only want content to appear in locations where selected products are currently in stock.
To use this feature:
- Turn on Link products.
- Choose a stock rule in Display Conditions.
- Select products using Browse Products.
The two display condition options shown in the app are:
- Only display if all in stock
- Display if any in stock
When products are linked, the media will only show on screens at locations where the selected products meet the stock condition you chose.
Schedule when the media can play
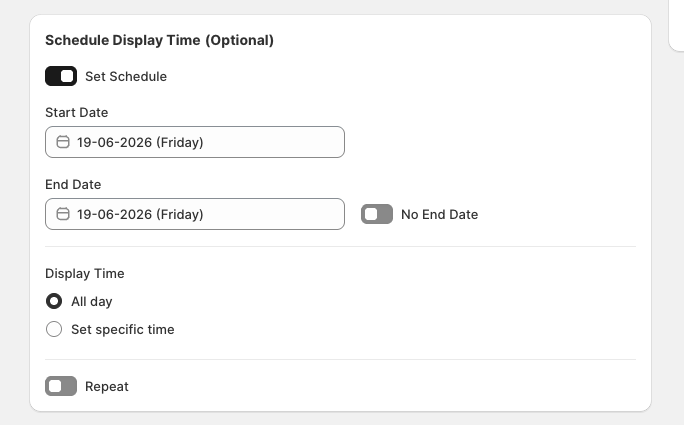
The Schedule Display Time (Optional) section controls when screens are allowed to show the media.
To schedule a media item:
- Turn on Set Schedule.
- Choose a Start Date.
- Choose an End Date, or enable No End Date.
- Under Display Time, choose All day or Set specific time.
- If needed, enable Repeat.
This setting is optional, but it is useful for promotions, limited-time campaigns, and time-sensitive messaging.
When to use each content type
Image
Use Image for posters, promotional graphics, brand visuals, and campaign artwork. You can either upload your own file or choose Generate with AI.
Video
Use Video when motion content is the best fit for your screens, such as animated promotions or brand-led display content.
Product
Use Product when you want screen content tied more closely to catalogue items, especially when stock-aware visibility matters.
Best practices for Media
- Give each item a clear, searchable name in Name so it is easy to find later.
- Set a sensible Display Duration so content stays visible long enough to be read on screen.
- Use Link products when stock availability should control whether content appears.
- Use Set Schedule for promotions with a fixed start or end date.
- Use AI image generation for quick drafts, seasonal concepts, or placeholder creative.